Showing posts with label easy. Show all posts

Monday, June 6, 2016

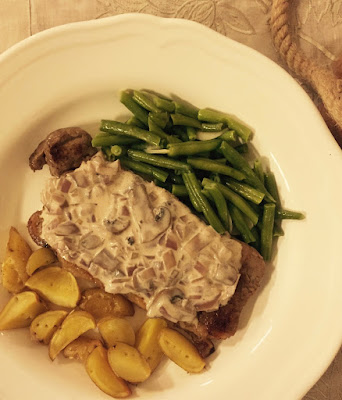
Day 158: Jamie Oliver's Steak and Chips

I tend to watch a lot of cooking shows while I'm traveling. I'm not sure exactly why. Maybe because I don't get the Food network at home, nor do I have time to watch it! But I've stumbled across some of my favorite recipes from celebrity chefs while channel surfing in hotel rooms.

I've never tried a Jamie Oliver recipe (though I've gotten many of his cookbooks as gifts for friends.) Like most of his recipes, it's meant to be simple, economical and for the most part, healthy.  I have also never made steak before and it was super easy on a cast iron skillet.  It came out super yummy for the first time I'd ever made steak!  


Ingredients:

800 g baking potatoes
olive oil
optional:  2 sprigs of fresh rosemary
1 small onion
100 g button mushrooms, or whatever you can find
50 ml cream
1/2 teaspoon Dijon mustard
400 g frozen French beans
4 cloves of garlic
500 g flank steak

1.  Preheat the oven to 400 degrees F (200 Celsius). Halve the potatoes and slice them into wedges. Put in boiling salted water for 4 minutes, then drain and tip into roasting tray. Drizzle oil over it, adding salt and pepper per taste. Toss with rosemary leaves (if using) and roast for 40 minutes or until golden and crispy, turning over occasionally.

2.  Peel and slice the onion along with the mushroom. Put the vegetables into a medium pan on medium heat with salt and pepper to taste and a drizzle of oil. Cook for 10 minutes or until lightly golden, then add cream, mustard and a splash of water. Lower the heat and simmer, adding water if needed.  

3.  Put the frozen beans into a large frying pan on medium heat with some oil. Stir to help them defrost. Peel and slice the garlic, adding to the beans once all the liquid has evaporated. Lower the heat and cook for 5 minutes until crispy and golden.

4.  Season the steak with salt and pepper, rubbing with a little oil. Pound with a mallet to flatten and tenderize. The steak should be flat now, about 1/2" - 1" in thickness. Sear in a cast iron skillet (or hot frying pan) to a high heat. Turn every minute for 5-6 minutes for medium-rare, or until cooked to your liking. Add thyme or rosemary for last 2 minutes. Remove to a board, letting it rest for 2 minutes.  Add any resting juices to the mushroom sauce and season.  Spoon the mushroom sauce over the steak and serve with potato wedges on the side.

Source:  https://www.lifestylefood.com.au/recipes/23043/secret-steak-and-chips-with-garlicky-green-beans
Wednesday, November 11, 2015

Day 315: Turning a Tazo tea tin into a crayola tin

I had finished my tin of Tazo gingerly jasmine green tea, and I couldn't bear to throw away (or recycle) the tin.  I kept it in the back of the cupboard thinking what can I do with this?  At the same time, I was getting tired of storing all of my kids crayons in a Ziploc bag.  It just looked really untidy, and was getting hard to manage.

Solution?  Use the tea tin for the crayons!  It was the perfect size and with a quick refurbishing, it was did a good job of occupying by toddler as he repeatedly dumped all the crayons out, and put them back in.


You will need:  Tazo tea tin, glue stick, construction paper, scissors.

1.  Clean off the tin, trying to get the adhesive off of the top (this is probably the most difficult and least fun part of the whole process).


 2.  Measure out a piece of construction paper, cut it, and apply glue from a glue stick to one side.  Also apply the glue to the sides of the tin, especially on the corners.  


3.  Firmly apply the paper around the tin.  Make sure to seal the edge.  We know how little toddler hands like to explore every nook and cranny looking for an edge to pull on and rip.


This was fairly easy DIY project and took me less than five minutes to do.  Another advantage to this is if the paper rips off or gets too full of doodles, I can easily replace it with another piece of construction paper.  You can get more creative with stickers, and ribbons.  I kept it simple.  It came out so well, the next time I have this tin, I might just use a decorative paper and keep it for myself!  It would be a handy place to put hair ties, lip balms, or other small items.


Wednesday, August 19, 2015

Day 231: 15 minute pasta sauce...that doesn't come in a jar

Last night I was struggling to find something to make for dinner.  I had a pack of whole wheat rotini, and a can of whole tomatoes.  Together, with a few other staple ingredients I was able to make something quick and easy for my whole family to enjoy.  Yes, it was just pasta and sauce, but I made the sauce myself instead of breaking into my emergency stash of jarred pasta sauce.  The real thing has more depth of flavor, and tastes amazingly good!


Ingredients:
1/4 cup olive oil
3-4 cloves garlic
1 green onion
15 oz can of whole tomatoes
basil
oregano
red pepper flakes (optional)
salt and pepper to taste
8 oz package of pasta 
parmesan cheese (to sprinkle afterwards)

1.  Start boiling water, with a dash of salt.  When water comes to a boil, put in pasta until it is no longer al dente (about 10-15 minutes).

2.  Slice up the green onion, and mince or crush the garlic.  Heat the oil on low to medium in a pan, sauting the green onion and garlic.  Add tomatoes and stir.  

3.  Reduce to a simmer.  Add the basil, oregano, salt and pepper to taste.  Drain the pasta, and add to the pan with the sauce.  Stir under low heat.  Serve immediately, with parmesan to sprinkle on top.


You can use whole tomatoes if you like.  Just put them under hot water for about 10 minutes, until the skin is soft and can be easily removed.  I used a green onion, because I happened to have it on hand, but if I didn't I would have used about 1/4 cup of sliced yellow or red onions.  I'm a fan of using what you have!  For the spices, I used a few dashes of the basil and oregano.  Hard to quantify, but if you are unsure just add a little at a time tasting in between.  I also added a dash of red pepper flakes for some spice, but you can leave that out.

As with any pasta sauce, adding veggies or ground meat can be added.  I have found on many occasions this pasta sauce really doesn't need much.  The tomatoes give it a nice hearty taste, without being too heavy.

Enjoy!